The posterior chain: this part of the body is often discussed in fitness circles, but we still find that it is often neglected in our day-to-day culture of sitting. Guilty as charged! Our world of tight hip flexors, weak glutes, and underdeveloped core musculature can be really tough to counteract when we spend 6-8 hours sitting every day!
Enter the glute bridge – a perfect, quick, no-equipment posterior chain exercise that can improve your functionality, improve your posture, and increase your total-body strength in just a few minutes per day. Whether your goal is to run faster or simply to alleviate hip or knee pain, the benefits of this compound exercise are easy to realize with a few sets tacked on to a lower body micro workout, or as a stand-alone mini-session throughout the day.
How to do a Glute Bridge

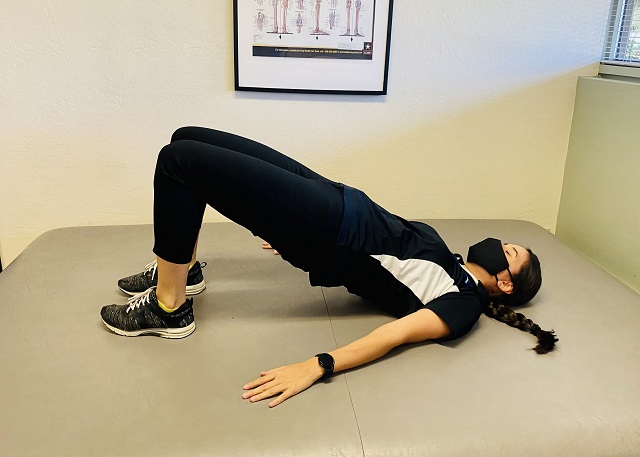
- Lie on your back, and bend your knees at around a 90 degree angle. Place your hands to your side or over your chest and your feet flat on the floor at about shoulder width.
- Take a deep breath and lightly flex your core.
- Press through your feet into the floor, stopping when your thighs are in line with your upper body. I like to stop when I feel a gentle stretch in my hip flexors (the front of the hip between the pelvis and the upper thigh).
- Pause for a moment at the top in the bridge position. If done properly, you should feel a contraction in the glutes and hamstrings.
- Under control, lower yourself back down to the floor, reset and repeat.
Note: you are welcome to play with your foot placement on the floor in order to target certain muscle groups or just to determine a position that’s comfortable for you. See modifications below:
Benefits of glute bridges
They require no equipment
We hope the benefit here requires no explanation. Similar to a pushup, squat, or plank, the glute bridge requires no equipment and very minimal time investment. As a business owner and father of two, my days of two hour workouts are likely over. But I have very little problem committing to a couple 5-10 minute workouts during the day, especially if I don’t have to be in a traditional gym to do them.
If you have a similarly busy lifestyle, glute bridges could be a fantastic addition to your daily routine.
They are highly functional
Glute bridges train the major muscles of the posterior chain, namely the hamstrings, glutes, and spinal erectors. These muscles are highly active in day-to-day activities like walking, running, picking up objects off the ground, or jumping. After a few months of consistently performing this exercise, you’ll notice improvement in all of these areas.
They will improve your balance
Perhaps it should go without saying that improving the strength and strength-endurance in your lower body and core musculature will improve your balance. This is especially important as we get older.
It’s far easier to maintain fitness over time than it is to build it once we’re injured. A few sets of the glute bridge exercise a few times per week, coupled with other balance building exercises (like walking lunges or squats) can go a long way towards keeping us healthy, pain free, and mobile over our lifetimes.
They help counteract the effects of prolonged sitting
There is much talk of methods to counteract the problems created by the sitting-centric culture we live in. And honestly, we’re not complaining. Our modern society has many benefits! It’s just that widespread physical functionality doesn’t seem to be one of them. This exercise does a great job at strengthening weak muscles while also stretching tight ones (hip flexors).
Toning the gluteal muscles, hips, and legs
Many people toil under the impression that they must put in a ton of work to build their glutes and tone their legs. However, if we’re working in the proper intensity range, this exercise will fire up the muscles along your backside and build them.
Glute bridges, when modified appropriately, can even target the pelvic floor and are often used in pelvic floor therapy.
Muscles involved
The “posterior chain” is generally thought of as a group of muscles along the backside of the body: the glutes, hamstrings, and spinal erectors. Some descriptions of the posterior chain go on to include all of the backside musculature, including the calves, lats, and rear delts. However, for the purposes of this article, we will focus on the benefits of building the big three posterior chain muscle groups:
Functions of the Hamstring
The hamstrings are a group of large muscles along the backside of the upper leg and are responsible for both flexing the knee joint (raising your foot behind you) and extending the hip (as in standing up). This muscle is critical in functional tasks like locomotion, getting up and down stairs, as well as picking up objects off of the ground. It tends to be underdeveloped in people who sit a lot.
Functions of the Glute Muscles
The glutes are, of course, the prime mover in this exercise. The glutes are the most powerful muscle in the body, responsible for aiding us in all of our locomotive activities. The glutes assist in abduction and extension of the upper leg, as well as aid in external / internal rotation of the upper leg. In short, they help with standing, squatting, running, walking, picking things up, jumping, etc.
If you add a resistance band to the exercise, you can also add an extra challenge by firing up the gluteus medius, or the upper portion of the glute along the outer edge of the glutes. This muscle is critical in balance and stabilizing the hip during motion.
Functions of the Erector Spinae (Spinal Erectors)
Bridges and hip thrusts also have the benefit of building static strength in the lower back because the muscles in the low back work to stabilize the position of the spine during the movement itself. Think of it like the opposite of doing a plank – your low back is working against gravity to maintain a good spinal position.
Many of us have a fear of working the low back directly, especially those with a history of pain or injury in this region. However, we also have evidence that strength in these muscles is correlated with less pain and improved function. Obviously, there is some nuance here – don’t take this as gospel if your low back is currently injured or in pain (if that’s the case, get checked out). Just know that in general, improving the strength of our core musculature (including our low back) is great for managing pain.
How to Work Glute Bridges into Your Daily Routine
Frequency and Volume
Current research in strength and conditioning suggests that optimal volume for strength improvements is a total weekly volume of 10-20 work sets per week, with a weekly frequency of two or more workouts per week. With that in mind, here are a couple sample plans for working glute bridges into your routine:
- 5 sets of bridges, twice per week on non-consecutive days, resting approximately 60-90 seconds between sets.
- 4 sets of bridges, three times per week on non-consecutive days, resting 60-90 seconds between sets.
- 3 sets of bridges, four times per week, resting 60-90 seconds between sets.
- 2 sets of bridges, five times per week, resting 60-90 seconds between sets.
We would suggest starting on the lower end of the volume range until you know how your body is going to respond. Remember that with starting any new exercise, you may get extremely sore the first 2-3 times you do it. This is OK, and it’s to be expected. If you keep it up, the exercise will stop making you sore after a couple of weeks.
How many reps per set?
Since this is a body weight exercise, you’re likely going to have to regulate the number of reps you do based on how you’re feeling. In general, we’d recommend 10-15 reps per set. However, the important part is that you do reps until you feel that you’ve got only 2-3 correct form reps left in the tank. We encourage you NOT to go to the point that your form breaks down, but to stop a couple reps before that. With that in mind, here’s how a sample workout could look:
Set 1: 15 reps, rest 60 sec
Set 2: 14 reps, rest 60 sec
Set 3: 12 reps, rest 60 sec
Set 4: 9 reps
This individual did reps until they felt like their form would break down within a couple of reps, then stopped each set.
Modifications to the Glute Bridge
The glute bridge is a fantastic exercise in part because it can be done anywhere and doesn’t require a huge amount of warming up or equipment. That said, there are a few modifications you can make to the glute bridge, depending on your goal:
Hamstring-Focused Bridge
To involve the hamstrings more, move your feet further away from your body. You don’t need much, just a few extra inches and you’ll feel you hamstrings much more in the exercise.
Glute-Focused Bridge
To take the hamstrings out of the movement and focus more on the glutes, move your feet closer to your butt when you perform the exercise.
To involve the glute medius
The glute medius is heavily involved in single leg exercises that require stabilization of the pelvis (such as running or hiking). To involve the glute medius to a much higher degree, wrap a resistance band around your knees and focus on pushing the knees outward as you complete the rep.
The Hip Thrust
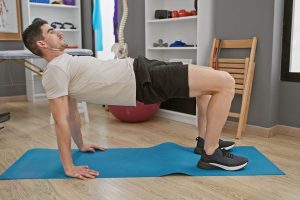
Another modification of the glute bridge is the “hip thrust”, which is essentially the same exercise but done with our back up on a bench, like so:
If you’ve got access to a bench, you’re welcome to use one. However, I’ve had similar results from using a chair or couch. This variation increases the exercise’s range of motion and will provide an added challenge to the involved muscles.
Similarly to the hamstring and glute modifications above, you can control the involvement of the hamstring by moving your feet further away or closer to your body as you perform the hip thrust.
Advanced Glute Bridge Variations
Once you’re able to comfortably do 3-4 sets of 15+ repetitions, it’s probably time to make the exercise harder.
Weighted Glute Bridges
These can be accomplished by either adding a weight across your lap (any dumbbell, weight plate, or barbell will do). Don’t go nuts here, just a little bit of weight will do. Continue working until you can do 3-4 sets of 15+ again, then add more weight and start over.
Single Leg Glute Bridge
This version will fire up the posterior chain and may be preferable to the weighted version because it retains the no-equipment nature of the original exercise.
To perform the single leg version, straighten one leg and lay it on the floor next to the working leg. Then bring your body up in line with your working leg like you would in a normal glute bridge.
What to Expect from Glute Bridges
As we mentioned above, a few sets of bridges a few times per week can easily fit into most of our schedules and will go a long way towards maintaining health and strength in our hips, as well as counteracting the effects of long sitting. Is this exercise a silver bullet that will solve all your problems? No, but combined into a logical routine including strengthening activities for other body parts, it’s a fantastic way to stay healthy and fit for years to come!


