Spinal stability is an important factor in physical health that many people don’t often think about or know about. Using the spinal stabilization exercises outlined in this article, you can avoid low back pain, sciatica, sacroiliac joint pain, hip pain, and a host of other pelvic dysfunctions.
You may have heard the terms:
- Spinal stability,
- Lumbopelvic stability; and/or
- Pelvic stability.
I want to help define what these terms are. In order to do so, I will review the anatomy, discuss the mechanics of stability and show you an exercise progression to improve spinal stability.
What Does Spinal Instability Look Like?
As a clinician, I will look specifically at individual segments of the spine and assess their relative stability vs instability. Stability means; “The state of being stable.”
Imagine you are trying to jump from a dock into a lake. As you push off the dock with your lower extremities the dock is stable and gives you the chance to propel yourself far out into the lake.
Now imagine you are jumping from a rowboat or canoe into the same lake. As you push with your lower extremities to propel yourself into the water the boat moves backward. You barely clear the edge of the boat and you can’t propel yourself very far into the water.
Clearly launching yourself from a more stable steady platform allows the energy exerted through your legs to be used to propel your entire body into the lake. And when the same energy is applied to the unstable surface the energy acts upon the unstable segment (in this case the rowboat or canoe), pushing it away from you.
Patients with unstable spines often present with back pain or the instability causes back tweaks.
Spinal Stabilizer Muscles
Our spines and pelvis act like the dock or the boat. The spine, especially the lumbar spine, along with the pelvis, works to provide a stable surface from which our extremities can move through the world and produce work.
In order to gain a better understanding of how the exercises below will benefit your back health, let’s first review the spinal stabilizer muscles.
The Pelvis and Lower Extremities
The pelvis and lower extremities contain a number of stabilization systems that are important for a healthy back.
Looking at the lower half of the skeleton you can see the connection between 2 Major areas that form the foundation for your hip and pelvic areas that help stabilize the spine:
- The spine and the sacrum, the shield-shaped bone structure located at the base of the lumbar; and
- The sacrum and the pelvis, which extend to the hips.
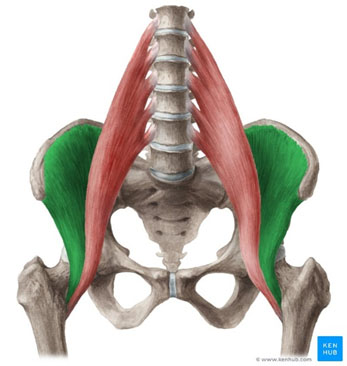
Highlighted in red in the photo is the iliopsoas muscle, the long muscle that originates from the back of the abdominal wall, connecting to the side of the lumbar vertebral bodies and inserted at the lesser trochanter of the femur, which is right behind the top of your leg bone.
Highlighted in green is the iliacus muscle, the broad triangular muscle that originates from the inside of the ilium, the wide bones on each side of your hips. It joins the psoas and connects to the hip at the lesser trochanter.
Spinal Muscles
The multifidus is a long spinal muscle with many points of origin and insertion. This muscle literally travels from the sacrum up to the neck.
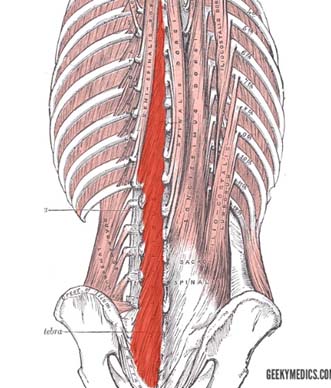
This muscle begins at the posterior (back portion) of the sacrum and runs through the:
- Superior iliac spine,
- Mammillary processes of lumbar vertebrae,
- Transverse processes of thoracic vertebrae, and
- Articular processes of C4-C7.
The multifidus muscle is attached to the Spinous processes (the projection of bone that you can feel on a person’s back) beginning 2-4 bones above the origin of the muscle, and attached to each vertebrae (except C1).
These paraspinal muscles are a group of muscles that run lengthwise along the spinal column, from the skull to the pelvis.
There are two points that I would like to make note of due to their importance in spinal movement,
- All three start at the same place—specific areas at the base of the spine,
- All have a lumbar, thoracic, and cervical part, including muscle fibers that insert on varying aspects of the spinal vertebrae and ribs.
The Gluteal Muscles and the Hips
The gluteal muscles, often called glutes, are a group of three muscles that make up the buttocks:
- The gluteus maximus,
- Gluteus medius; and
- Gluteus minimus.
The three muscles originate from the ilium and sacrum and insert into the femur. They are important when performing daily activities and the functions of these muscles include:
- Extension,
- Abduction,
- External rotation, and
- Internal rotation of the hip joint.
However, there are some deep spinal stabilizer muscles in this region, known as the “deep six”:
“The Deep Six” (Deep Spinal Stabilizer Muscles)
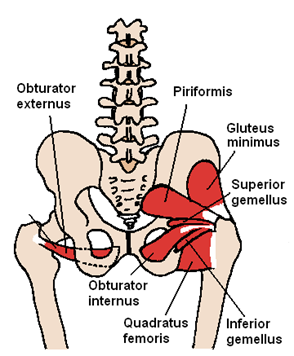
The deep six get their name because they are deep inside the hip, under the more well-known butt muscle, the gluteus maximus. They all attach to the inside of the greater trochanter, which is the bulb at the top of your thigh bone that goes into the hip socket. They fan out to different locations around the low pelvis. One of the most important muscles here is the piriformis.
Abdominal Muscles
The abdominal muscle group is made up of four major muscles:
- Rectus Abdominis
- Transverse Abdominis
- External Abdominal Oblique
- Internal Abdominal Oblique
1. The rectus abdominis is one of the two pairs of muscles that contribute to the anterior abdominal wall.
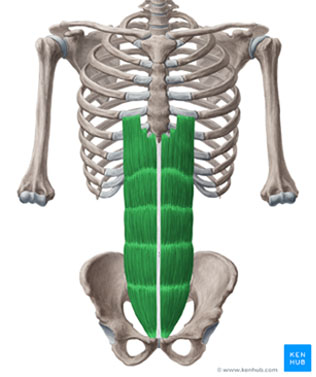
The name ‘rectus abdominis’ means straight abdominal and is indicative of the parallel direction the fibers of the muscle take as they pass from their origin to their point of insertion.
The rectus abdominis attaches from the cartilage of ribs in the front below the breast bone to the pubic bone and ligament.
2. The transverse abdominis muscle is the deepest of the 6 abdominal muscles. It extends between the ribs and the pelvis, wrapping around the trunk from front to back. The fibers of this muscle run horizontally, similar to a back support belt.
In this way, along with providing postural support, the transverse abdominal muscle helps to contain and support the organs located inside the trunk. Transverse abdominis muscles are one of the main core muscles that help with lumbar spine stabilization through the support of the lumbopelvic area.
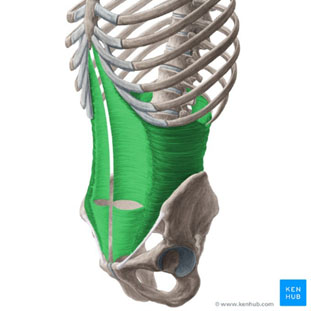
3. The external abdominal oblique muscle is one of the outermost abdominal muscles, extending from the lower half of the ribs around and down to the pelvis.
Together, the external oblique muscles cover the sides of the abdominal area, being large and sitting on the top surface of the abdomen right below the subcutaneous fat and skin.
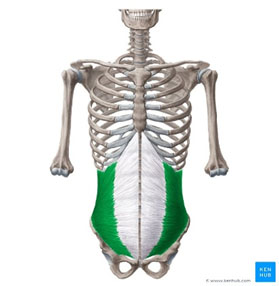
4. The Internal abdominal oblique is a muscle found on the lateral (away from the midline of the body) side of the abdomen. Internal obliques are underneath the external obliques on each side of the trunk. It is broad and thin.
(insert picture of the internal obliques)
This quick summary of the anatomy is to impress upon you the interconnection between the spine, pelvis, and lower extremities. When you have instability or restriction in one area, there is always a compensatory response in an adjacent area.
Top Spinal Stability Exercises
For our discussion, stability will refer to the ability to move your extremities while maintaining a stable core or spine.
I want to start you on the basic few spinal stabilization exercises that we practice in physical therapy to get a feel for stability-promoting activities. The activities are easier to start in the supine position, (on your back). Each of these would then transition to
- Side lying,
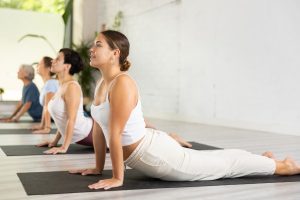
- Prone (on your stomach),
- Sitting; then
- Standing
How to practice this:
Step 1: Identify the subtle motions of your low back. Keeping in mind that the joints of the low back have the same distribution of Mechanoreceptors as the hand.
Mechanoreceptors are the nerve receptors embedded in the capsule of joints and some ligaments. They help control movements. In the case of the low back, the movements are equivalent to the fine motor actions of the fingers.
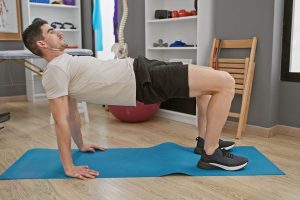
Simply lay on the floor on a yoga mat. Keep your knees bent up and practice a posterior pelvic tilt.
In this position, roll your hips back and press back into the floor or mat.
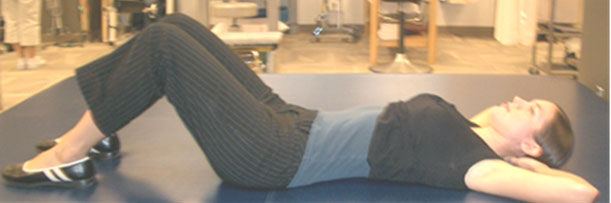
You want to begin to feel your abdominals brace (tighten) and be careful not to push down on your heels. You want to be able to control very small movements of your low back. Once this is achieved you can move on.
Step 2: Add some extremity movement. For all of these, start with abdominal bracing through a small pelvic tilt then perform a small march activity. Think of the spine and pelvis like the dock in my earlier comparison.
Pelvic Tilt with marching: Lifting one foot off the mat about 1 inch, keeping your pelvic tilt, then return that foot and march with the other. Then relax your abdominal brace (pelvic tilt). Keep the amplitude of foot movement to a very small amount.
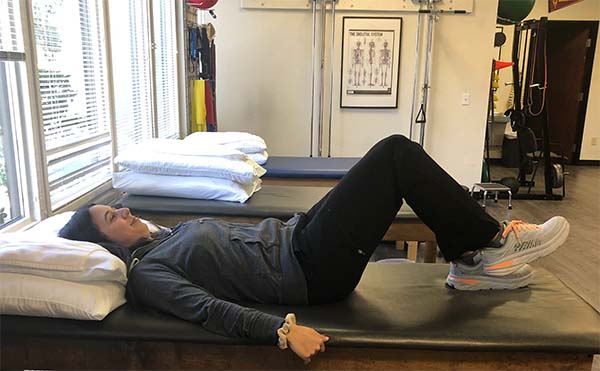
What you are practicing is the ability to move your feet while keeping your lumbar spine and pelvis in a stable position.
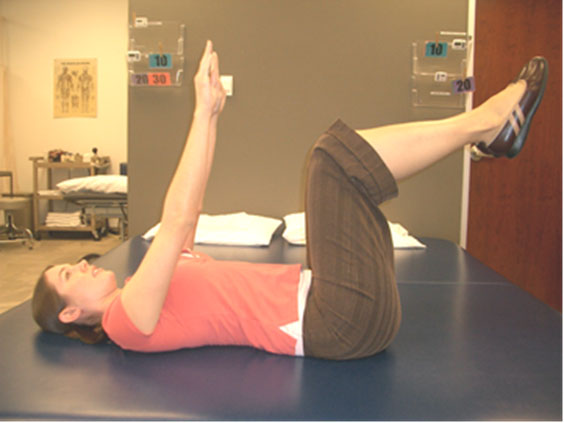
Dead bugs: Hold This position for 10 seconds with your back pressed into the floor or table. As a progression, slowly move one foot and opposite side hand away from your body. ONLY move your extremities as far as you can, while maintaining your back pressed into the floor or table.
Step 3: Once you have a strong sense of being able to hold an abdominal brace (pelvic Tilt) you start changing positions.
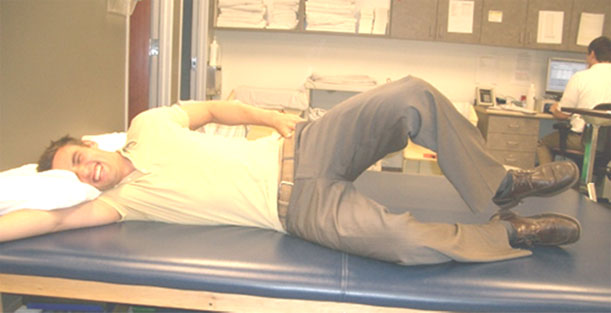
Here are a couple of examples. A good side lying exercise is clams and/or hip abduction.
Clams: Lie on your side with knees bent and together. Keeping your spine stable through abdominal bracing them perform the hip movement. Lift your toe and knee away from your bottom knee while your feet stay together. Do NOT roll your hips back. Hold for a count of 2. Repeat 3 sets of 10 repetitions on each side.
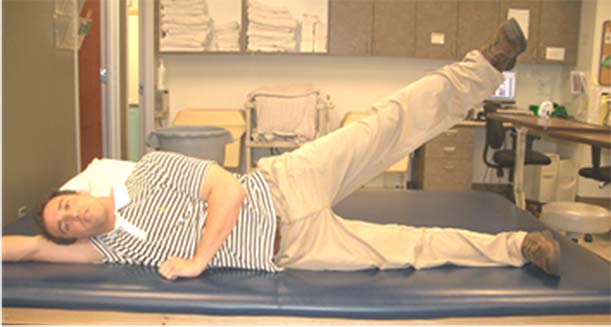
Side lying hip abduction: – Lay on your side with legs together. Keeping your spine stable through the abdominal area, bracing them to perform the hip movement
- Raise your leg in the air leading with your heel.
- Keep your toe pointed straight.
- Make sure you do not roll your hips or upper body.
Principles of Spinal Stability
The important principles of spinal stability include the following;
- Gain a stronger sense of where your back is in space (Kinesthetic awareness) By practicing a pelvic tilt while lying on your back and knees bent
- As your control of your pelvis and low back improves begin adding upper and lower extremity movements
- Continue the progression by changing from being on the floor to sitting and standing exercises.
- Always do exercises in a pain-free range of motion
- Consult with your Physical Therapist if you have questions
If your pain is coming from your SI joint, see our full guide on self-sacroilliac joint reset exercises.
Exercise Frequency and Next Steps
In order to maintain a strong, healthy spine, you can use the spinal stability exercises in this article daily. Just make sure that if you encounter any pain or discomfort, call your physical therapist or medical provider to seek further guidance.
Spinal stability plays a crucial role in maintaining a strong and healthy back, especially as we age. The intricate network of muscles, ligaments, and bones, including the deep stabilizing muscles such as the multifidus and transverse abdominis, work harmoniously to provide support and protect the spine from injury.
By prioritizing spinal stability through appropriate exercises and adopting good postural habits, individuals can reduce the risk of back pain and injuries while enjoying a better quality of life.