Shoulder pain may can have many causes. These causes can be related to an obvious incident or injury or may spontaneously start. According to the National Center for Biotechnology Information (NCBI), up to 26% of adults will experience shoulder pain with rotator cuff and sub acromial bursa being the most frequent causes. In this article I want to review the anatomy, discuss self-assessment and home exercises to handle shoulder pain. However, an important reminder first:
This post is intended to help you assess what is causing your shoulder pain. You can read the whole article or use the links below to go directly to the topic most relevant to you:
- Anatomy of the shoulder
- Common shoulder injuries
- Shoulder pain causes and risk factors
- How to assess your shoulder pain’s cause
Also, if you are done reading about assessing the shoulder pain, and are ready to learn how to rehab your shoulder, click here for our post on the topic of rehab / prehab for the shoulder.
Anatomy of the shoulder
The shoulder is a complex joint, requiring optimal mobility and stability in order to properly function.
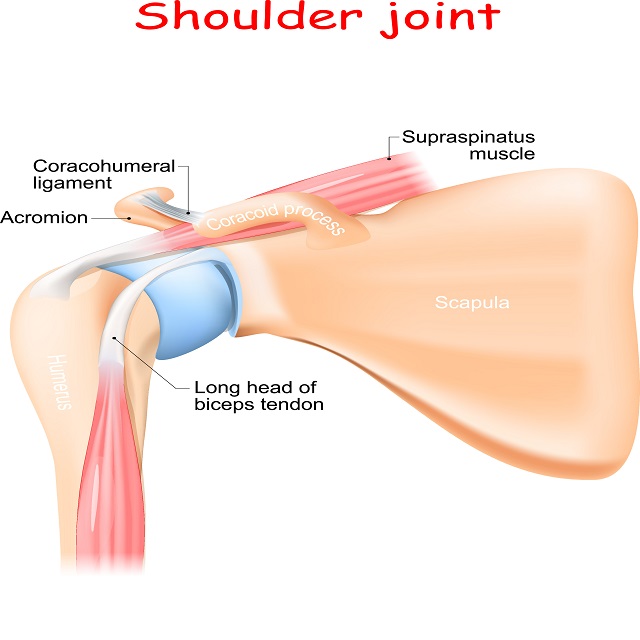
The Scapula is a projection of the scapula called the acromion articulates with the clavicle (acromioclavicular joint), the rib cage (scapulothoracic joint) and the socket which is another projection of the scapula is called the glenoid and it articulates with the “ball” which is the upper end of the humerus (Glenohumeral joint).
Scapulohumeral rhythm is the coordinated motion of the scapula and humerus experienced during shoulder movement and motion that has been traditionally viewed as occurring at a ratio of 2:1 (2 degrees of humeral flexion/abduction to 1 degree of scapular upward rotation). In order to have normal shoulder mobility/stability you must have mobility/stability of your shoulder blade.
Rolling and gliding of the humeral head; In order for your shoulder to move into elevation, there needs to be coordinated rolling and gliding of your rounded humeral head on the concave glenoid socket.
Common shoulder injuries
Dislocation
If your shoulder is pulled back too hard or rotated too far during a fall or accident, the ball (humeral head) may pop out of the socket (Glenoid). You will feel pain and weakness in your shoulder with an inability to move your arm. There may appear an obvious deformity. You may also have swelling, numbness and bruising.
Separation
This injury affects the joint where your collarbone (clavicle) and shoulder blade (scapula) come together. It’s called the acromioclavicular (AC) joint. A fall or hard blow tears the ligaments holding it together. If your collarbone gets pushed out of place, you will have a bump on top of your shoulder.
Fracture
A bone can break or crack if you fall or take a hard hit. The most common breaks are to the clavicle (collarbone) and the humerus (arm bone closest to your shoulder). You’ll have a lot of pain and it may bruise. You will have difficulty moving your arm
Cartilage tear
You can injure the cartilage (Labrum is a cartilaginous “O” ring, that serves to deepen the socket.) The labrum attaches around the rim of the socket (Glenoid) of the shoulder joint. The labrum can tear with: repetitive motion, especially overhead motion and throwing, in a fall, or anytime your shoulder absorbs a lot of force. With this type of injury, you might feel pain when you reach over your head, and your shoulder could seem weak. It might also feel like catches, locks, or grinds. The labrum may also slowly degenerate over time in individuals that stress their shoulders daily.
Rotator cuff tear
Your rotator cuff is the group of 4 muscles and tendons in your shoulder that hold your arm in place and let you lift your arm up overhead. You can damage it through overuse or in a fall. It also begins to show wear and tear as you age. Your shoulder may hurt at night and when you try to lift things. You might hear a crackling sound when you move it.
If you have a clear injury in which you notice a sudden onset of pain or show these signs and symptoms you may have a more serious issue:
- Your shoulder joint looks deformed.
- You cannot use your shoulder at all.
- The pain is intense.
- You cannot sleep
- The shoulder, arm or hand is swelling suddenly.
Shoulder pain causes and risk factors
Frozen shoulder
This condition limits how much your joint will move. Abnormal bands of tissue (adhesions) build up in the joint and keep your shoulder from moving freely. Your shoulder might “freeze” because pain or surgery have made you use it less, allowing the adhesions to build up.
Impingement
This happens when the tendons of the rotator cuff get pinched in the bones of the shoulder. It can cause swelling and pain. If you lift your arms over your head a lot, it can set this off.
Bursitis
The bursa (a fluid-filled sac that cushions in your joint) can get swollen and irritated if you repeat the same motions frequently.
Other causes of shoulder pain.
Osteoarthritis
Also called degenerative joint disease, this is the most common form of arthritis. It can affect any joint, including your shoulders. The cartilage between bones breaks down, and they rub together. This can cause pain and stiffness.
Rheumatoid arthritis
This is a disease that causes your body’s immune system to attack the protective lining in your joints. It can also cause pain and stiffness in your shoulders.
Referred pain
Sometimes your shoulders hurt when there is nothing wrong with them. This can be a sign of trouble with your gallbladder, liver, heart or another organ.
Tendinitis
This is when the tendons that make up your rotator cuff get inflamed. It can happen slowly over time or as the result of a fall or a direct hit to your shoulder.
Bone spurs
Also known as “osteophytes,” these small, smooth pieces of bone rub up against and wear on your rotator cuff and keep your shoulder from moving the way it should. They can lead to tendinitis or a rotator cuff tear.
However, If you have shoulder pain with gradual onset or pain that comes and goes you may want to do a self-assessment.
- Can you move your arm normally, or is your shoulder too stiff or painful?
- Does your shoulder feel unstable or like it could pop out of the socket?
- Is your shoulder strong enough for things you normally do?
- Is Your arm or hand is weak or numb?
- What time of day or night does your shoulder hurt?
- Do you sleep on your painful side or with your arms over head? (If Yes, please stop. Irrespective of the cause of your shoulder pain. These postures can contribute to the problem and make it more difficult to recover)
Self assessment of shoulder pain
Identifying the root cause of your problem is a very important step in the road to recovery. This will give you a chance to decide whether or not you need to bring in a professional, or simply work to rehab the injury yourself. Hopefully, it can also give you an appropriate timeline for healing. In many cases of shoulder pain, a brief assessment of the pattern of your pain is sufficient to get you on the right track for self-management. As always, if you have questions, please call your doctor or therapist.
Below are five movements you can use to assess the pattern of your shoulder pain. In each of these tests we are looking for:
- Restricted movement one side compared to another
- Pain in any or all the available range of motion
- A “painful arc” is pain in a portion of the available mobility, usually at middle to end of the available range of motion.
- Weakness
- Clicking or popping (clicking and popping under your shoulder blade VS your shoulder joint (glenohumeral joint) needs to be differentiated.
- Apprehension
In all of the tests, pay attention to the symptoms they produce. If you experience no pain, move on to the next test. If you experience mild or even moderate pain, it may be safe to continue to the exercises in the next post. If the pain is severe, please call your therapist or doctor for a screening. Use common sense here – there’s no sense in making an injury worse if you don’t need to.
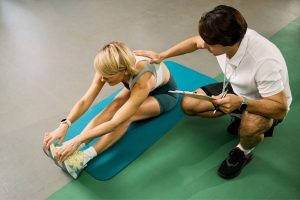
Assessment # 1: Active range of motion (AROM) testing
For this test, we will be simply moving your shoulder through basic ranges of motion to see if they produce any of the painful or unpleasant symptoms listed above. Follow the directions below and pay attention to the symptoms you perceive.
- First, raise your arms in front
- Lower them, and then raise our arms to the side
- Hold your arms out like an airplane and then bend your elbows to 90 degrees with your palms facing forward
- Move your palms towards the floor in an arc and then back towards the back wall.
If during this motion you experience any of the symptoms described above, then it may indicate you need further help. Continue reading for some more specific self assessment tools.
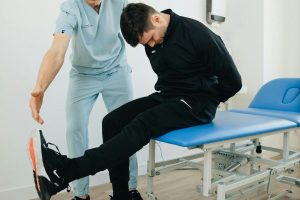
Assessment #2: Front chicken wing (modified Hawkins test)
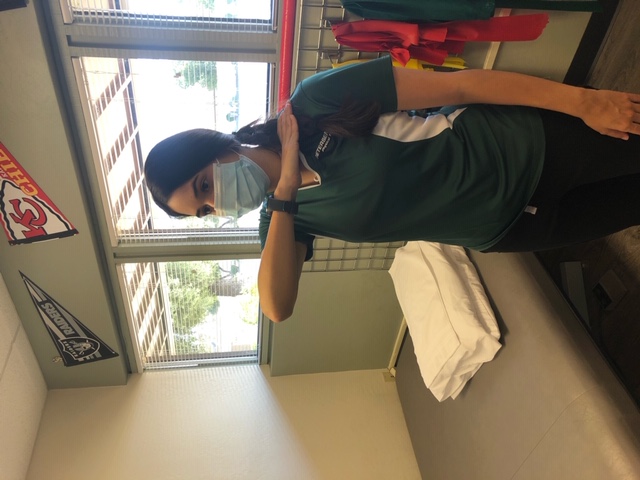
Place painful side hand on opposite shoulder. Raise painful side elbow toward the ceiling. Pain may suggest impingement of the rotator cuff or possibly the labrum.
If you experience pain during this test, you can still perform the exercises, but proceed with caution. If you can perform the exercises and they don’t increase your pain, then keep doing them, if not, call your therapist.
If you complete this test and experience no pain, then that’s great! Proceed to the next test to continue assessing your shoulder.
Assessment #3: Back scratcher (internal and external rotation screening exam)

Stand tall with your feet together and arms hanging comfortably. Make a fist so your fingers are around your thumbs. In one motion, reach the right fist over the head and down your back as far as possible while simultaneously reaching your left fist up your back as far as possible. Do not “creep” your hands closer after the initial placement.
This is a general test of mobility in the shoulders and will be used as a measure of progress. If you experience any pain, clicking, apprehension, or restriction during this test, it could indicate problems.
If you have no pain, proceed with the rest of the tests, do the exercises, and use it as a retest after 2-3 weeks.
Assessment #4: Single arm self hug (crossover test)
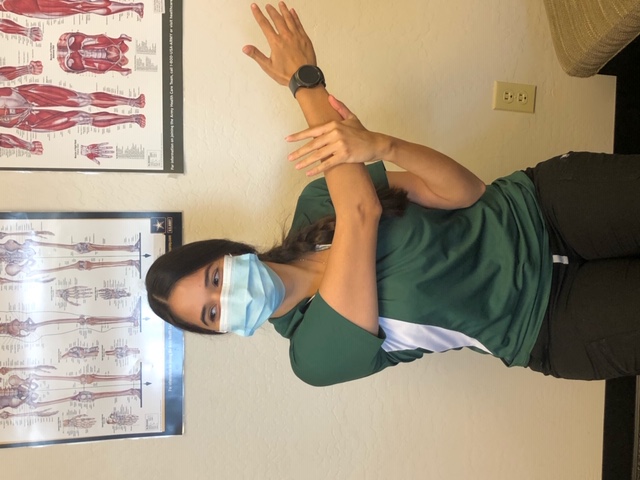
Place painful side hand on opposite shoulder. Take opposite hand and gently pull the painful sides elbow across your body. Pain may suggest involvement of your Acromioclavicular joint (commonly called the AC joint).
If you find that you have mild pain you can still do the exercises. However, if the pain doesn’t improve as a result of exercise, we recommend seeing your therapist.
Assessment #5: Empty can test
Hold your arm at shoulder height at 45 degrees. Turn your palm down as if emptying a glass of water. If the simple movement does not hurt, place some gentle downward pressure on your wrist. If you experience pain, do the exercises in the shoulder exercise post, and reassess after two weeks.
Final words on assessing shoulder pain or dysfunction
With any test or exercise, assess your perceived level of pain from minimum, moderate, or severe. As stated above, any pain elicited that you would consider severe should be screened by a physical therapist or doctor. If you experience minimal or moderate pain, proceed with the exercises, but be careful not to make the pain worse.
The exception would be that if you have acute pain from a fall or obvious injury, then make sure you are assessed by a physical therapist or doctor.
Read our next post for the 10 exercises you can do from home. Complete these exercises for 2-3 weeks and then return to these assessments to see if you’ve made progress. If symptoms worsen or continue, please give us a call.