Back pain? Busy schedule? Sit a lot? We totally understand. This simple 3-minute core strength micro-workout is a no-frills way to develop core strength and combat nagging aches and pains. The best part: all you will need is a timer!
The first part of this post will provide some background information on core strength and the reasons we have chosen these exercises for the program. If you’d like to skip directly to the workout, click here.
Core strength is important!
Core strength and endurance is a foundational element of remaining functional, healthy, and pain free. Among other things, the core has two primary functions:
- To protect the spine and internal organs.
- To transfer force from the lower body to the upper body (and vice versa).
Every time you reach for a book on a high shelf, stand up from your chair, pick a box up off of the floor, or throw a ball, your core is working hard to perform its two basic functions. Developing the ability to stiffen our core muscles and stabilize our spine is vital for preventing injury and improving our level of full-body strength – and it also has the side benefit of alleviating back pain.
The core is more than just the Six Pack!
The “core” muscles are those muscles deep in your body supporting your spine from your head to your tailbone. The core muscles also include pelvic floor muscles and are supported by deep hip muscles, abdominal muscles and deep shoulder muscles.
Many people associate “core” musculature with the “six-pack” – otherwise known as the rectus abdominis. However, there is a lot more going on in the core than meets the eye. In addition to the “six-pack”, the core musculature generally includes:
- The internal and external obliques – responsible for side bending as well as building intra-abdominal pressure.
- The transverse abdominis – also known as the “deep abdominal wall”, responsible for stabilizing the lumbar spine and pelvis.
- The muscles of the lower back and spine: the erector spinae, quadratus lumborum, and multifidus – responsible for maintaining rigidity in the spine under load, as well as spinal movement.
Don’t get lost in the weeds with “Core Workouts”
A simple search for “core workouts” reveals page after page of “Top 10” or “Top 20” exercise lists that would take 30-40 minutes to complete. I don’t know about you, but I don’t have 40 minutes to devote to 20 different core exercises. Even if I did, doing 20 exercises would likely be counterproductive anyway – most of us would get so sore that we wouldn’t want to or be able to train again for a week! On top of that, if I have 40 minutes to spend on resistance training, I would prefer to work my entire body, not just a single area!
In our opinion, where general strength and health are concerned, we would prefer to recommend exercises that cover as many bases as possible. Enter the exercises:
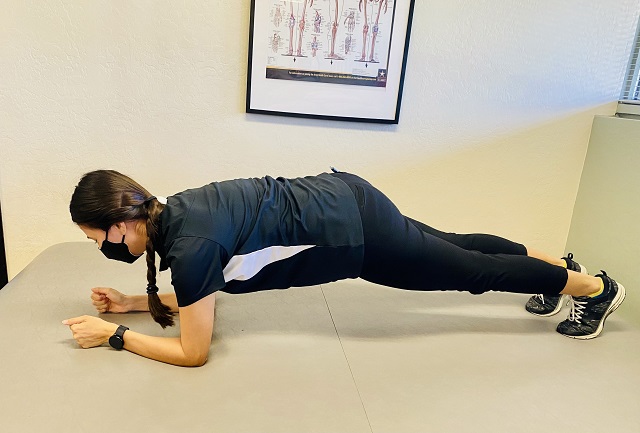
Planks and Side Planks
Planks are a simple exercise that is sometimes ignored due to being perceived as too easy. Don’t be fooled. This study utilized EMG data to compare muscle activation between the prone plank and the 6-rep max (6RM) back squat in trained lifters. The results may surprise you!
With proper form, the prone plank will activate the rectus absominis (six-pack), obliques, and (to a lesser degree) the muscles surrounding the spine, with assistance from the glutes, quadriceps, shoulder stabilizers and triceps. For some people, holding this position for more than a few seconds can be quite challenging!
The side plank doubles down by activating the spinal muscles and obliques to a much higher degree while still receiving help from the front of the core, the glute medius, deltoid (shoulder), and trapezius (upper back).
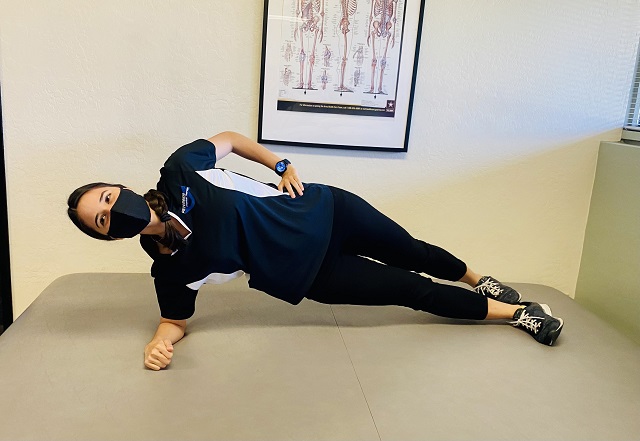
Notes on plank and side plank form
While holding the position, squeeze your glutes and rotate your pelvis forward. It can be helpful to imagine trying to pull your pelvis into your armpits, while simultaneously trying to pull your elbows down towards your hips.
Ready? Put 3:00 on the Clock!
This no-frills program can be performed 5-7 days per week. Just put three minutes on the clock and perform one of the three exercises at the top of each minute, starting with the prone (regular) plank. We recommend choosing a set time for each exercise in advance and progressing until you are able to complete a one-minute hold of each exercise, back-to-back with no breaks.
A note on progression
One thing of note – we DO NOT recommend that you start out by attempting the full three minutes with no breaks. We recommend that you work up to it, by using the principle of progressive overload:
The principle of progressive overload simply states that we can create an adaptation in the body by gradually increasing weight, duration, or frequency of an exercise slowly over time.
In the case of a simple bodyweight exercise like the plank, we will utilize this principle by increasing the duration through a pattern known as step-loading. Step-loading is a scheme of progressive overload wherein we utilize the same level of resistance for a few workouts in a row before progressing. This will allow you to utilize this basic program every day without ever getting sore or having to feel like the work is too difficult. If you have never done planks before, we recommend the following schedule, 5-7 days per week:
| Week 1 | Week 2 | Week 3 |
| 10s plank 50s rest 10s side plank 50s rest 10s other side plank | 15s plank 45s rest 15s side plank 45s rest 15s other side plank | 20s plank 40s rest 20s side plank 40s rest 20s other side plank |
| Week 4 | Week 5 | Week 6 |
| 25s plank 35s rest 25s side plank 35s rest 25s other side plank | 30s plank 30s rest 30s side plank 30s rest 30s other side plank | 35s plank 25s rest 35s side plank 25s rest 35s other side plank |
| Week 7 | Week 8 | Week 9 |
| 40s plank 20s rest 40s side plank 20s rest 40s other side plank | 45s plank 15s rest 45s side plank 15s rest 45s other side plank | 50s plank 10s rest 50s side plank 10s rest 50s other side plank |
| Week 10 | Week 11 | |
| 55s plank 5s rest 55s side plank 5s rest 55s other side plank | 60s plank 60s side plank 60s other side plank |
In the beginning, you may be tempted to jump ahead and perform multiple rounds. Remember that’s not the point of the exercise! It is supposed to be performed daily. If you start hammering 3-4 rounds of planks and make yourself very sore, you will find it very challenging to talk yourself into doing it the next day. Stick with one round per day – you will reap all the rewards after a few weeks.
What if you have already got some core strength built up and you’re ready to jump right into week five from the beginning? Go ahead! If you have never done planks before, know that they can lead to serious soreness the next day. Use your best judgement. Be patient and make progress over time. Personally, I like to do these in the middle of the day – sitting for a while can lead to some unpleasant stiffness that is easily rectified with a few minutes of quick activity!
Extra Credit: Add a Glute Bridge
Ok, we know that we said the program is only three minutes long – and it is – unless you decide to swing for the fences and add the fourth exercise. This transition is easily made by flipping onto your back and performing the glute bridge for a final (fourth) minute:
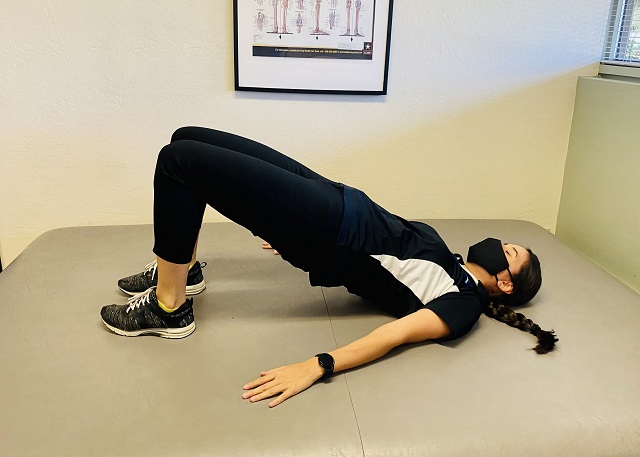
Performed properly, the glute bridge has the added benefit of activating the lower back muscles (erectors, multifidus, and QL) directly, while also providing quite a burn for the glutes and hamstrings. On the glute bridge, follow the same cues you used for the plank. Squeeze your glutes but keep your pelvis neutral – resist the temptation to extend the lower back on this exercise. Use your hamstrings to try and pull your heels in towards your butt while simultaneously trying to “spread the floor” with your heels.
We recommend progressing the glute bridge in the same way you did with the planks – start with a 10 second hold and add five seconds per week until you are able to do all four minutes with no breaks.
In Conclusion
That is it! Remember that the workload of this program is intentionally low – you will need to do it often in order to see pain relief and strength improvements. If you miss a day, don’t sweat it. Just pick up where you left off. There are many, many core exercises that are very effective, but we have found that sometimes keeping it simple is best.
If you are so inclined, you’re welcome to try this program with more advanced exercises – the ab wheel, hanging leg raise, or banded Pallof press can be extremely effective as well (though they will be a good bit tougher). They also have the added complication of requiring equipment. To each their own. Just make sure you are medically cleared to try more advanced exercises before you make modifications.
Good luck!