Want to tighten up your arms? Improve posture? Improve some nagging shoulder pain? Look no further than this upper body micro workout, which can be completed in around three minutes. The best part is, you can easily complete this in the middle of the day in an office or lunchroom (if you’re so bold), right before bed, or before showering in the morning. Let’s get started:
Note: This is part three of our micro workouts series. If you haven’t read our core micro workout or our leg micro workout, then go ahead and read them first. Without further ado:
Upper body strength is not just for looks!
The upper body has many moving parts and is generally responsible for more varied tasks than the areas we’ve covered previously. The upper body is responsible for assisting in all of the manipulations we do on a day-to-day basis:
- Lifting a heavy box from a countertop onto a high shelf (overhead strength)
- Pulling a backpack or purse off the floor and slinging it over your shoulder (horizontal pulling)
- Pushing a heavy object such as a file cabinet or dolly across a floor (horizontal pushing)
- Holding an object in front of us while walking from the home or office to the car (grip and static upper back strength)
The list could go on, and therein lie the benefits. Improving upper body strength will have the benefit of making all the above tasks (and more) feel easier while promoting bone density, mobility, and general fitness. You will notice that it’s easier to maintain posture while sitting or standing, your ability to pick up heavy objects improves, your shoulders will naturally function (and look) better, and your grip strength will improve. You may even notice decreased pain in your shoulders or neck if that’s an issue for you.
Add to that the fact that the glenohumeral joint (shoulder) is generally the most mobile joint in the human body and is therefore one of the least stable. You could think of this joint as a golf ball laying on a golf tee. With all that mobility, it is important for the muscles around to be strong. By increasing the strength and stability in the muscles that pull on the shoulder joint and upper spine, we will improve our quality of life while decreasing our chances of all sorts of common injuries.
And will you look better? Almost certainly. Which brings us to:
Don’t skip upper back work
Many of the “micro workouts” posted online are simply circuits of pushups, shoulder, and triceps exercises. While the pushup could be called one of the best exercises of all time for its portability and effectiveness, one of the most classic upper body training blunders is skipping upper back work. For a variety of reasons, this is a mistake! Our first (and only) commandment of upper body work is this:
Work your back as hard (and as often) as you work your chest and triceps.
Having a strong upper back has a host of benefits, not the least of which is improved posture. Luckily, this is relatively simple to do using compound exercises like rows and pullups. All row variations will work the back and biceps as a unit. They will recruit all the large muscles in the back –
- The latissimus dorsi (swimmer’s muscle, extending from the shoulder down to the lower spine)
- The lower and upper trapezius (the triangular muscle which stretches from your mid-back to your neck, and across to your shoulders)
- The rhomboids (for proper scapular retraction and rotation)
- The spinal erectors (for upright endurance)
- The posterior (rear) deltoids (to improve rotation and stability at the glenohumeral joint)
- The biceps (important for overhead activities and picking things up from the ground)
- The forearm flexors and extensors (grip strength)
See how easy that was?
The Exercises
The problem with upper body work is there’s no “one” exercise that will do everything. Whereas exercises like lunges will build the entire leg, something like a pushup will only work the pushing muscles, leaving half the upper body neglected. So we must include at least two exercises – a push and a pull.
The other problem is that we MUST plan rest periods into the workout. Most of us simply can’t do a single upper body exercise for 3 minutes without a break.
We’ll solve both of these problems using antagonistic supersets. We’ll do three sets each of pulls and pushes – our pulling muscles will get a break while we do pushups, and our pushing muscles will get a break while we do rows:
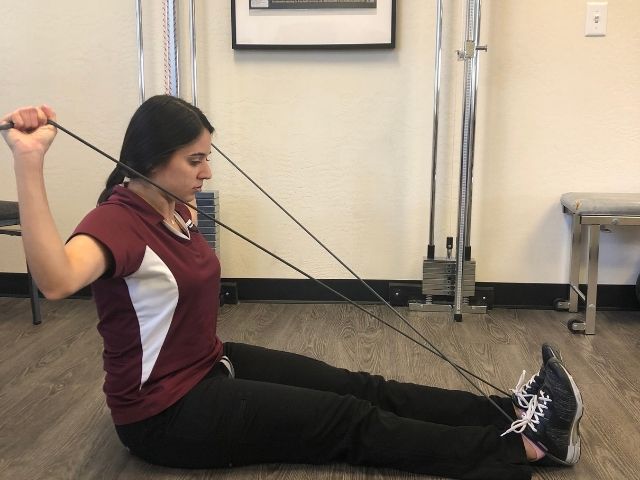
Exercise 1: Seated Resistance Band Rows
We have chosen the seated resistance band row for its portability. You can literally do them anywhere, and a resistance band is easy to stuff in a purse or backpack. We have chosen to do them first in the workout because they tend to serve as an excellent warmup for the second exercise, pushups. Feel free to switch the order if you want – this is just what I personally prefer.
The row comes with an obvious caveat – it requires an exercise band. They tend to cost around $10 on Amazon or at your local sporting goods stores and are one of the most valuable exercise tools since they allow us to do “pulling” exercises without specialized equipment like free weights or cable machines.
If you don’t have an exercise band, it is fine to do inverted bodyweight rows using waist height chairs or a table. Pick whichever of the two exercises fits your lifestyle best – for the purpose of this workout, they are interchangeable.
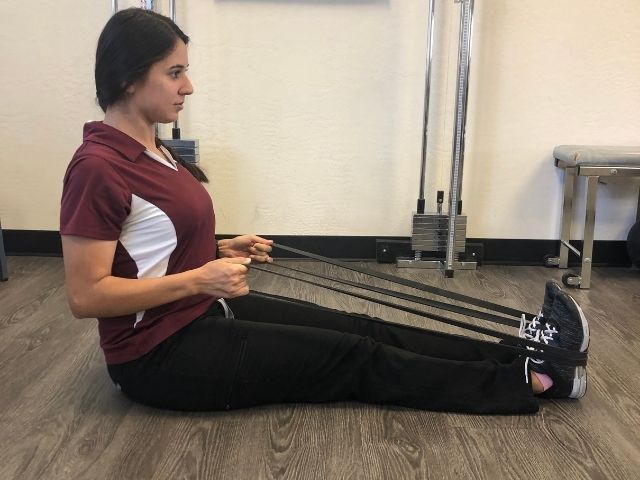
Form cues for the seated resistance band row:
- Sit on the floor with your feet directly in front of you. Wrap the band around your feet and grab the ends of the band so that there’s a slight bit of tension in the band. Play with your grip to achieve this. I find that if I loop my wrists through the band and then grab the excess with my hands, the tension is perfect.
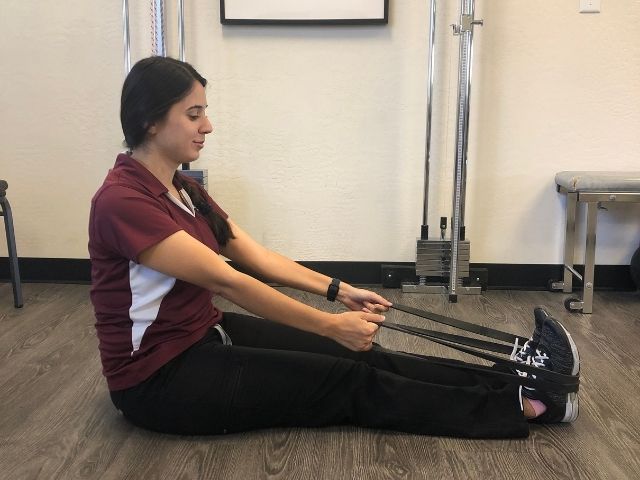
- Maintain an upright back angle, or lean slightly back. The more we lean back, the more of the upper trapezius we will use. The less we lean back, the more latissimus dorsi we will use. I recommend leaning only slightly back as it will engage all the back muscles most evenly.
- Imagine pulling with your elbows (not your hands). Keep your elbows tucked at a 30-40 degree angle from your body. As you pull, maintain a “proud chest” (see below) and pinch your scapula (shoulder blades) back and down. It can be helpful to imagine trying to grab a pencil between your shoulder blades. At the end of the range of motion, your forearms should be about in line with your belly button.
Important: If you decide to use a resistance band row, make sure to pause at the end of the rep briefly before letting out the band tension. The band’s tension will build as it stretches, and so pausing at the end of the range of motion is what gives the exercise its effectiveness. If you reach a point where you can no longer pause at the end of the rep, you have reached technical failure – stop the set.
Exercise 2: Pushups
Pushups are one of the first exercises most of us ever learned in gym class or sports. And yes, they are great. They utilize all of our classic “pushing” muscles in one go – the triceps, anterior (front) deltoids, and pectorals. There’s not much to say about pushups, other than a few simple form cues:
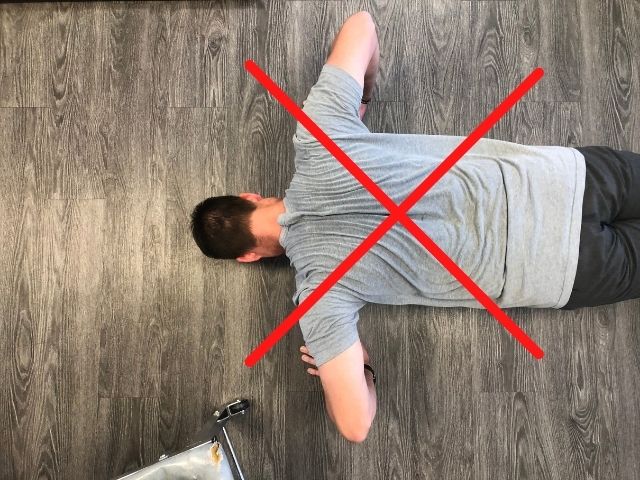
- Do not flare your elbows directly out to the side. Instead, tuck them at around a 45-degree angle so that your body position with your upper arms forms an arrow shape, rather than a T shape. Many people erroneously think that flaring the elbows directly to the side will engage the chest more. Not only is this false, but it places the shoulder in a compromised position that can lead to shoulder impingement in some individuals. If you’re in the middle of a set of pushups and are unable to continue without making the exercise easier by flaring your elbows, you have reached technical failure – stop the set.
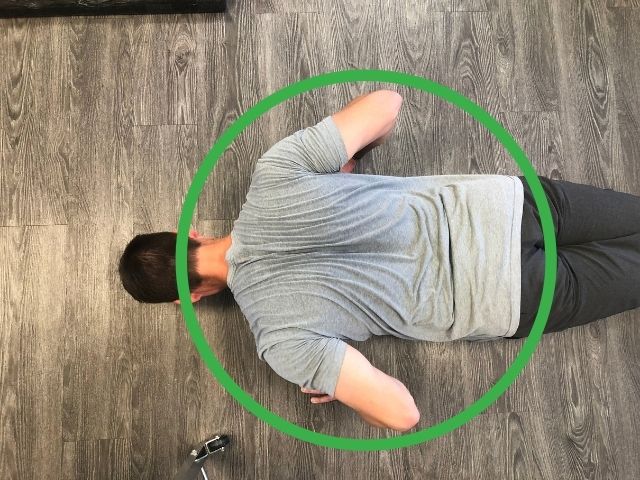
- The easiest way to achieve this position is to place your hands slightly outside shoulder width and just below the nipple line during your setup.
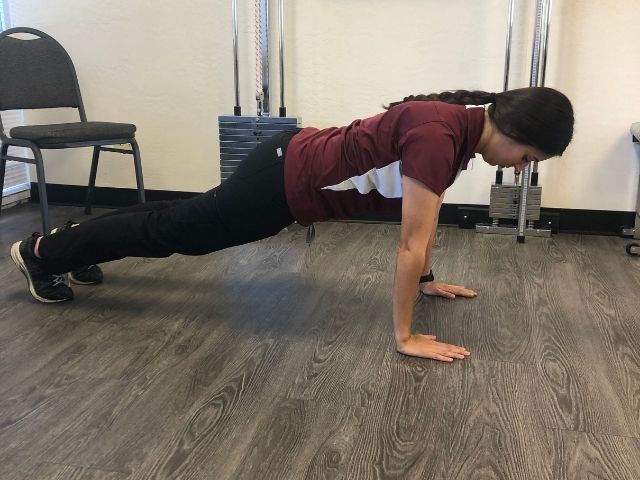
- Keep your back flat – don’t allow your hips to sag. Sagging hips generally means that core strength is your weak link – check out our core micro workout here for a quick fix.
Use knee pushups if you need to. If you’re unable to complete more than a few pushups, we recommend going with the knee pushup on the concentric portion of the exercise. Lower your body like a normal pushup, then drop your knees onto the ground to push yourself back up. Then get back up on your toes for the next rep, etc. This allows for proper progression and comfort with the overall form and difficulty of a push up. It is suggested to start here if it has been a while since you have attempted push-ups.
How this Workout Works
The structure of the workout is simple: take your “max” on each exercise (the number of repetitions you can perform before hitting “technical” failure, where your form breaks down), and divide the number by 3. If you get a decimal, round down. This number will be your “work set” number. (Note: it’s a good idea to do a “testing day” 1-2 days before you start this plan, so you can determine your work sets while still being fresh for your first session). Your work set should be a number you can hit easily.
Once you’ve determined your work set number, you’re ready to start. Perform a “work set” of each exercise, back to back, for 3 rounds. Sound simple? It is! But there’s a catch:
On your last set, you will perform an AMRAP set, which stands for As Many Reps As Possible (with good form). So, an example workout may look like this:
- 7 rows
- 6 pushups
- 7 rows
- 6 pushups
- 10 rows (couldn’t get a good pause on the 10th rep)
- 8 pushups (slowed down significantly on the 8th rep)
This person stopped their AMRAP when they felt like they might fail on the next rep. In my experience, doing all three supersets takes around three minutes. If this sounds too easy, understand that this is just the first workout. Read on:
Progression Plan
Like our other micro-workouts, we will include a built in mechanism for progression. Remember that the individual workouts don’t matter – it’s the “progressive overload” over time that leads to strength improvements. Starting easy simply gives us a lot of runway to make progress.
We will utilize a step-loading pattern, like our other micro-workouts. Stick with the same work set number for a week at a time. This ensures that each session will leave you feeling fresh – 2 “easy” sets and one “hard” set per exercise, per day. Progress as follows:
- RULE 1: If you’re getting more reps on your AMRAP set than on your work sets, increase the number of your work sets by one.
- RULE 2: If the number of reps in your AMRAP sets is equal to or less than your work sets, stick with the same number for your work sets.
- RULE 3: If you stick with the same number for your work sets for two weeks in a row, decrease the number of your work sets by 3 and work back up. This “deload” will allow for greater recovery for a few weeks. Once you reach the level you got stuck on, you’ll likely progress past it.
That’s it. If you stick with this plan for a month or two, you’ll notice the work sets become significantly more challenging – this is what we want.
A note about day-to-day fluctuations, soreness, and frequency
We recommend that you start by completing this workout three times per week, until you know how you’re going to respond. If you’re just starting to exercise – you may get very sore in the beginning. If you get sore for more than 2 days after a workout, stop doing the AMRAP sets for now – just do the three work sets. Add them back in after a week, when you’re more acclimated to the exercises.
Keep in mind that muscle soreness from exercise (DOMS) doesn’t mean anything – it doesn’t mean the workout was good (or bad), and it has nothing to do with lactic acid, muscle damage, or growth. It’s typically a response to a “novel stimulus”. In other words, it means you did an exercise that your body isn’t used to doing. Most people find that it takes around two to three weeks of repeating the same exercises before their muscles stop getting sore.
Once you are through the initial phase, you are welcome to increase the frequency to 4-5 times per week if you want to. We do not recommend doing this more than five days per week.
If you are doing this type of workout frequently, understand that your strength level will change day-to-day. Just because you get less reps on Wednesday than you did on Monday doesn’t mean you got weaker. It probably means you’re not completely recovered from Monday’s workout. It could also mean that you got less sleep than usual on Tuesday night, were more stressed on Wednesday morning, or your nutrition wasn’t quite as good on that particular day. Don’t sweat it. This type of day-to-day fluctuation is to be expected.
Recommended: Add Face Pulls!
Functional fitness “experts” have made a habit of singing the face pull’s praises from the rooftops in recent years. While I’m not sure that I agree that face pulls are a silver bullet that will solve world hunger and do your taxes, I do agree that face pulls offer a host of benefits:
- They work the often neglected (and stubborn) middle and rear portions of the deltoid directly.
- They directly train external rotation of the shoulder and will build strength in the four muscles surrounding the shoulder joint including – the supraspinatus, infraspinatus, teres minor, and rhomboids In English, this means your shoulder will be more stable and less prone to injury.
- They are known for improving one’s ability to maintain a neutral thoracic spine, especially while sitting.
- They will create a more rounded shoulder look, which will make your waist appear slimmer. So, regardless of gender, you will look better if you do face pulls.
Convinced? Try adding face-pulls as the third exercise in your supersets. You’ll need to use a lighter band than you do for rows – that is OK. Determine your work set, and then get after it! Some notes on how to face pull:
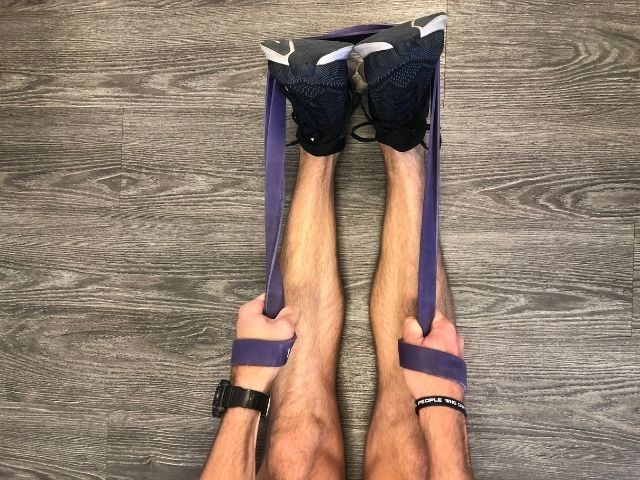
- The setup for the face pull is similar to the row, but we recommend crossing the band in front of the feet like so:
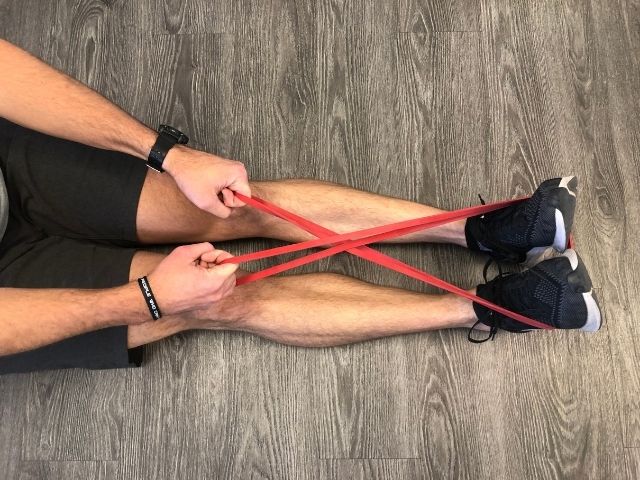
- Aggressively pull the band toward your forehead while also attempting to “spread” the band apart laterally. The end position should look something like this:
- Lower the band SLOWLY (2-3 seconds) – the shoulders are highly fatigue-resistant and respond well to slow eccentrics.
- Like other band exercises, PAUSE briefly at the end of the range of motion. I usually judge “technical failure” on this exercise as the point at which my muscles are too tired to hold the brief pause at the end.
Next Steps
If you get to a point where your work sets are 15 or more repetitions, switch to a harder exercise. You don’t have to do this, but it is recommended to continue making progress. Research has continually pointed out that muscle growth occurs (roughly) equally in the 6-30+ rep range, but that it’s the last 4-5 repetitions before failure that matter. In other words, if you’re capable of doing 30 pushups, then a set of 28 would include roughly 4 “effective reps” whereas a set of 20 would include 0 effective reps. Since high-rep sets of 15 or more can get very tiring (and boring!), in the interest of time it makes more sense just to make the exercise harder and keep the reps lower (in the 6-15 range).
For band exercises, making it harder is relatively simple – switch to a heavier band, determine your work sets using the instructions above, and work back up. For pushups, you may need to get a bit more creative:
- Switch to diamond (or close-grip) pushups (recommended)
- Place your feet on a chair or box
- Use elevated pushup handles to increase the range of motion
- Wrap a resistance band around your back for resistance band pushups
- Place a weight plate on your mid-back (below the scapula)
- Use a combination of the above
Like with our other two micro workouts – you’re free to make this workout yours. Sub out exercises as you see fit. You are welcome to sub out the pushups for other pressing movements, such as parallel bar dips or pike pushups. Likewise, you’re welcome to sub out the rows for pullup variations or three-point dumbbell rows.
If you’re planning to incorporate this three-minute workout into your routine, you could easily place it on opposite ends of the day from your other micro-workouts. For instance, do legs in the morning, core in the afternoon, and upper body in the evening.
In our next installments in the micro-workouts series, we will cover a more advanced upper body micro-workout, and finish with a post discussing options for putting the micro-workouts together and weekly planning. For now, feel free to contact us if you’ve got suggestions or feedback, and be sure to check back to our physical therapy blog often!